
Quick Start: Card Enrollment
Introduction
This is the fastest path to enrolling a card with Astrada end to end: authenticate, point a card at a subaccount, verify the cardholder with 3DS, and activate. Each step links to the detailed guide so you can go as deep as you need.
New here?If you only read one page, read this one — it maps the whole journey and links out. Astrada's
Card Enrollment SDK handles the verification UI and the verification steps for you; for the
conceptual walkthrough of what happens under the hood, see Single Card Enrollment.
Get the SDK
Astrada provides the Card Enrollment SDK — a hosted JavaScript bundle (no npm install). Add the script to your page:
<script
  type="text/javascript"
  src="https://sdk.astrada.co/v1/cardEnrollmentSdk.js"
  data-id="card-enrollment-sdk"
></script>
It registers a global CardEnrollmentSdk. Open the enrollment form for a cardholder's subaccount, passing a token provider and result handlers:
CardEnrollmentSdk.openForm({
  companyName: "Your company",
  subaccountId: "<subaccountId>",
  getAccessToken: async () => "<access token>", // must resolve within getAccessTokenTimeoutMs (default 5s)
  getAccessTokenTimeoutMs: 5000,                 // optional — raise if your token exchange is slow
  onConnect: () => { /* SDK connected */ },
  onSuccess: (data) => { /* card enrolled */ },
  onError: (data) => { /* show an error */ },
  onCancel: () => { /* cardholder abandoned the flow */ },
});
Each handler is optional — what fires it, and what you get:
| Callback | Fires when | Payload |
|---|---|---|
onConnect | the SDK connects to your page, before the form renders | none |
onSuccess | the card is enrolled | { subscriptionId, cardId, enrollmentGuidance, authenticationFlow } |
onError | enrollment fails | { type, error, verificationId?, cardId?, subscriptionId? } — type is "client" (SDK-side) or "server" (API); error carries detail, plus an errorCode when present |
onCancel | the cardholder closes the form before finishing | none |
onError includes cardId and subscriptionId once the card subscription exists, and verificationId once the verification exists (all three are present on a verification failure; all are absent on a pre-create rejection). Pass verificationId straight to GET /card-verifications/3ds/{verificationId}, or cardId to the per-card lookup, to read the failed verification's failureReason. The onSuccess / onError payloads and the full error-code catalog are in Error States & Remediation.
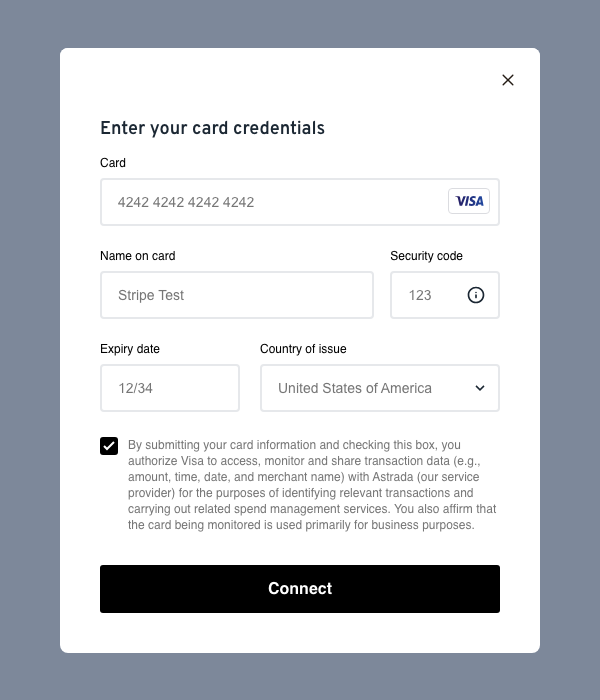
The SDK renders the entire verification UI for you — the card form below, a progress checklist during the wait (customize its copy with statusLabels), the 3DS challenge, and the HIGHEST two-hold confirmation:
Full setup and options: Installation; theming and branding: Visual Customization.
Using the SDK in React (TypeScript)
There's no npm package — the SDK is the hosted script shown above. In a React app you load that script once and declare the global so TypeScript knows about CardEnrollmentSdk.
First, add a type declaration in any .d.ts your tsconfig picks up:
// card-enrollment-sdk.d.ts
interface CardEnrollmentSdkConfig {
  companyName: string;
  subaccountId: string;
  getAccessToken: () => Promise<string>; // must resolve within getAccessTokenTimeoutMs (default 5s)
  getAccessTokenTimeoutMs?: number; // optional — extend the token-fetch window (ms, default 5000)
  onConnect?: () => void;
  onSuccess?: (data: { subscriptionId: string; cardId: string }) => void;
  onError?: (data: { type: "client" | "server"; error: unknown; verificationId?: string; cardId?: string; subscriptionId?: string }) => void;
  onCancel?: () => void;
}

declare global {
  interface Window {
    CardEnrollmentSdk: {
      openForm: (config: CardEnrollmentSdkConfig) => void;
      closeForm: () => void;
    };
  }
}

export {};
Then load the script. The simplest option is to keep the <script> tag from above in your public/index.html. If you'd rather load it on demand, inject it from a hook that tells you when the global is ready:
import { useEffect, useState } from "react";

const SDK_SRC = "https://sdk.astrada.co/v1/cardEnrollmentSdk.js";

export function useCardEnrollmentSdk(): boolean {
  const [ready, setReady] = useState(() => !!window.CardEnrollmentSdk);

  useEffect(() => {
    if (window.CardEnrollmentSdk) return setReady(true);

    const script = document.createElement("script");
    script.src = SDK_SRC;
    script.async = true;
    script.dataset.id = "card-enrollment-sdk";
    script.addEventListener("load", () => setReady(true));
    document.body.appendChild(script);
  }, []);

  return ready;
}
Finally, open the form from an event handler — the config and callbacks are exactly the same as above:
function EnrollCardButton() {
  const ready = useCardEnrollmentSdk();

  return (
    <button
      disabled={!ready}
      onClick={() =>
        window.CardEnrollmentSdk.openForm({
          companyName: "Your company",
          subaccountId: "<subaccountId>",
          getAccessToken: async () => "<access token>", // fetch from your backend
          onSuccess: (data) => console.log("enrolled", data.subscriptionId),
          onError: (data) => console.error(data),
          onCancel: () => {},
        })
      }
    >
      Add card
    </button>
  );
}
Next.js and token safetyCall
openFormfrom a Client Component ("use client") — it toucheswindow. And fetch the
access token from your own backend insidegetAccessToken; never ship the SDK client secret to
the browser.
The flow at a glance
sequenceDiagram
    autonumber
    participant CH as Cardholder
    participant You as Your app (via the SDK)
    participant Astrada as Astrada API
    participant Issuer
    You->>Astrada: Create card subscription (card + subaccount)
    Astrada-->>You: Subscription created — verification required
    You->>Astrada: Start 3DS verification
    Astrada->>Issuer: Authenticate cardholder (per the subaccount's risk tier)
    Issuer-->>Astrada: Frictionless or challenge result
    Astrada-->>You: completed (or a follow-up step)
    Note over You,Astrada: On success the subscription activates
Your configuration
How a card is verified is controlled by the subaccount's verification policy plus its enrollment controls. This is the whole picture in one place.
What am I enabled on? Inspect the subaccount with GET /subaccounts/{subaccountId}:
{
  "verificationPolicy": { "stripeValidationLevel": "MEDIUM", "sandbox": false },
  "configurations": { "...": "allowed countries / card types / funding" }
}
New subaccounts have no tier set — verification runs the default (non-Stripe) path for each network, not MEDIUM; that's a tier you opt into explicitly — with sandbox off. See Account & Subaccount Configuration for the full precedence rules.
What does each setting do, and what's its flow?
| Setting | Values | What it does | Flow / details |
|---|---|---|---|
verificationPolicy.stripeValidationLevel | MEDIUM · HIGH · HIGHEST · LOW (internal-only — set by Astrada); unset routes through the default, non-Stripe path | How strict verification is + what the cardholder experiences | Verification Risk Tiers · HIGHEST |
verificationPolicy.sandbox | true · false (default) | Route known test cards to the sandbox for deterministic testing | Test Cards & Sandbox Testing |
verificationPolicy.failedAttemptLockout | true · false (default) | Throttle a card across all networks after repeated hard verification failures | Verification Attempt Lockout |
configurations (country / card type / funding) | per-network allow rules | Which cards are eligible to enroll (independent of the tier) | Card Enrollment Controls |
How do I change a setting? PATCH /subaccounts/{subaccountId} (Update Subaccount) — send only the field(s) you want to change; it takes effect on the next verification.
Raise the tier:
PATCH /subaccounts/{subaccountId} HTTP/1.1
Content-Type: application/json

{ "verificationPolicy": { "stripeValidationLevel": "HIGH" } }
curl -X PATCH https://api.astrada.co/subaccounts/{subaccountId} \
-H "Content-Type: application/json" \
-d '{ "verificationPolicy": { "stripeValidationLevel": "HIGH" } }'{ "verificationPolicy": { "stripeValidationLevel": "HIGH" } }Turn on sandbox test routing:
PATCH /subaccounts/{subaccountId} HTTP/1.1
Content-Type: application/json

{ "verificationPolicy": { "sandbox": true } }
curl -X PATCH https://api.astrada.co/subaccounts/{subaccountId} \
-H "Content-Type: application/json" \
-d '{ "verificationPolicy": { "sandbox": true } }'{ "verificationPolicy": { "sandbox": true } }Requesting LOW returns 403 (internal-only). Test your settings → Test Cards & Sandbox Testing. Use them → the Steps below.
Steps
1. Authenticate
Get an access token for the Astrada API. See Authentication.
2. Choose a subaccount and set its verification policy
Cards are enrolled under a subaccount, and its verification policy decides how strict verification is and whether sandbox routing is on. New subaccounts have no tier set by default (the default, non-Stripe path runs instead) — set a tier explicitly (MEDIUM is the standard choice) and sandbox for testing before you enroll. The decision guide below helps you pick a tier — see Your configuration for inspecting and changing settings.
Which tier should I pick?
flowchart TD
    A[Pick a tier] --> B{Need the strongest proof of ownership?}
    B -- yes --> H[HIGHEST: 3DS + two-hold confirmation]
    B -- no --> C{Want an authorization-hold + fraud signals?}
    C -- yes --> G[HIGH]
    C -- no --> M[MEDIUM - standard choice]
Need issuer-side soft signals tolerated instead? That floor (LOW) is Astrada-managed, not self-assignable — contact Astrada.
3. Create the card subscription
Create the subscription that ties the card to the subaccount — this is the enrollment entry point. The SDK does this for you. What it does under the hood, conceptually: Single Card Enrollment.
4. Verify the cardholder (3DS)
Verification runs automatically based on the tier. The cardholder either passes frictionlessly or completes a 3DS challenge; at HIGHEST a frictionless result adds a two-hold confirmation. The SDK renders all of this for you. For how the tier shapes what the cardholder sees, see Verification Risk Tiers.
5. Activation
On a successful verification the subscription activates and the card is enrolled. From here you'll receive transactions for the card — see Webhooks and Cards, Subscriptions, and Verifications.
Test before you go live
Enable sandbox on a dedicated subaccount (verificationPolicy.sandbox: true) and use the test-card matrix to drive success, challenge, decline, and HIGHEST flows deterministically — no real money moves. See Test Cards & Sandbox Testing.
When something goes wrong
Every failure returns a structured error (errorCode / category / retryable) and maps to a specific cardholder screen. The full catalog of rejection states, causes, and remediation is in Error States & Remediation.
The SDK shows the cardholder that screen, but your backend never sees the verification. For server-side visibility into why a cardholder's card failed — support tickets, your own dashboards — see Triage a failed verification, which covers the lookup endpoint and every way to get the card ID you need for it.
Next steps
- Verification Risk Tiers — choose and configure the tier.
- HIGHEST Verification — the strictest tier's two-hold flow.
- Test Cards & Sandbox Testing — test every path before production.
- Error States & Remediation — handle every failure.
- Single Card Enrollment — what the SDK does under the hood, conceptually.